Purchase Order – Creation
Overview – Salesforce Purchase Order Creation in Ascent
This document will serve as an overview of the functionality available via Salesforce Purchase Orders (PO) to create a purchase order record in Ascent.
Definition: Purchase Orders are objects/records in Ascent that serve as a framework for receiving material that goes into inventory as well as recording receipts of services.
Purchase Orders consist of a header record, indicating who the vendor is, delivery location (typically your firm, except in the case of a drop shipment, which would be the customer), and summary price information, among other things and purchase order lines, which has the item being purchased, quantity, and price as a basis for procurement.
Received Purchase Order Lines get created when any line on the purchase order is received.
The purchase order function also gives you the ability to record a vendor invoice against received purchase order lines.
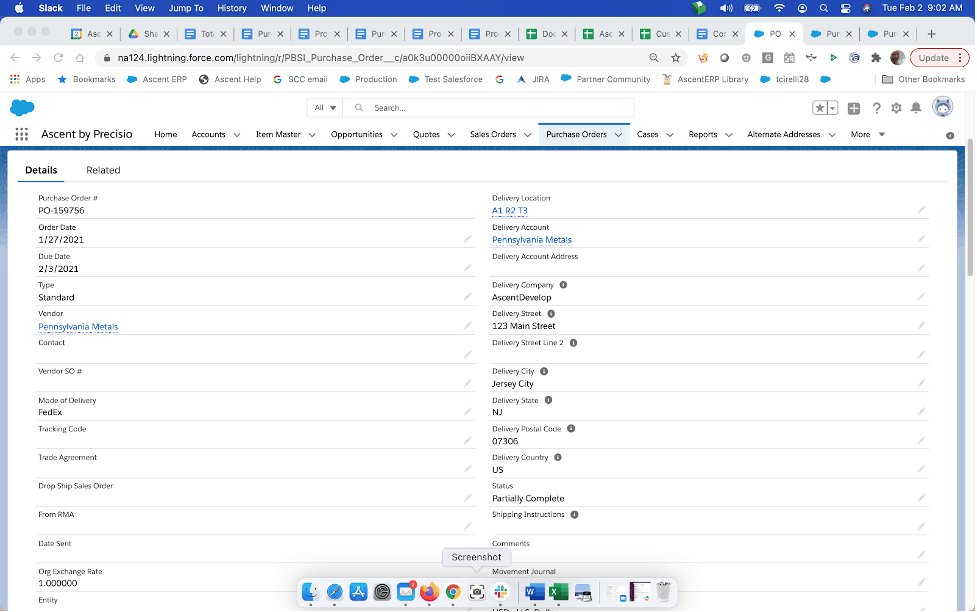
Process: to create a Purchase Order, go to the tab labeled “Purchase Orders” and click “New”. The following fields are available for entry/display, based on what your company has chosen to expose for use.
- Purchase Order # – this is assigned by Ascent. It has a prefix, PO-, followed by a 6 digit number. The number is an odometer, meaning that it has 1 added to it for each new PO created. This field is an autonumber field, managed by Salesforce.
- Order Date – the date this purchase order was created, by default. It can be manually added or overridden.
- Due Date – the due date of this purchase order. This defaults to today’s date plus 7. If the custom setting “Do not populate PO Due Date by default” is checked, then this field will be left blank and must be manually entered.
- Type – Standard – this is what most purchase orders are, simple procurement of goods and services, to be delivered to your own company location, a location of your choice, or a one time delivery.
- Drop Ship – companies have agreements with their suppliers (vendors) that if there is no stock available to ship to a customer, they can send their supplier a purchase order with a delivery address of the customer. In Ascent, this can happen if:
- The item is classified as “Allow Drop Ship?” = Yes.
- The item also has a default vendor.
- A sales order is created, and upon performing “PackSO”, no stock is available. An option appears on the sales order line stating “Drop Ship”. If that is selected, then a drop ship purchase order will be created, with the delivery address on the purchase order being the customer’s delivery address.
- Contract Manufacturing Purchase Order (CMPO) – this type of purchase order is used when you send material to your contract manufacturer (sub-contractor) to put together those materials. IT is often used when you have a capacity constraint, a machine breakdown, or unforeseen business. You would put one (or more) BOM-non Phantom items on your purchase order, send the PO to your contract manufacturer. When you complete the CMPO, the components on the BOM(s), which have been put on the PO Line(s), get deducted from inventory, and the PO Line items are put into inventory. Additionally, if you wish, Master Planner can suggest and create a CMPO for you. Fields that are required on the item master are:
- Item Type = “BOM”.
- BOM-Type = BOM-non Phantom.
- Suggest PO for Master Planner = “Yes” – that is, if you wish a purchase order to be created for this BOM-non Phantom. If an item is not to be used for CMPO, then you should also enter a Default Vendor, such that when you have issues manufacturing this in your facility, you can request a vendor supply you with this item. In that case, they would supply the material and you would be purchasing it from them.
- Default to CMPO = “Yes” if you wish Master Planner to always suggest a CMPO for this item. Answer “No” if you don’t want that. In either case, you would want a Default Vendor, such that the Master Planner wouldn’t consolidate ALL CMPO (or non-CMPO) suggestions into a single purchase order. This prompt is disabled if the answer to Suggest PO for Master Planner is “No”.
- Vendor – the supplier/vendor with whom this purchase order is placed. If entered, this vendor must have been previously created. However, if you wish to add a new vendor at this time, open the search window and click “New Vendor” to add one.
- Contact – the individual vendor contact with whom this purchase order is placed. This field is optional. If entered, this contact must have been previously created. However, if you wish to add a new vendor contact at this time, open the search window and click “New Contact” to add one.
- Vendor SO # – this field is optional, and can contain the sales order your vendor has assigned to this purchase order.
- Mode of Delivery – there is a picklist with multiple options from which to choose, however, your systems administrator can add, subtract, or modify any of the selections from this picklist.
- None
- FedEx
- UPS
- Roadway
- USPS
- Other
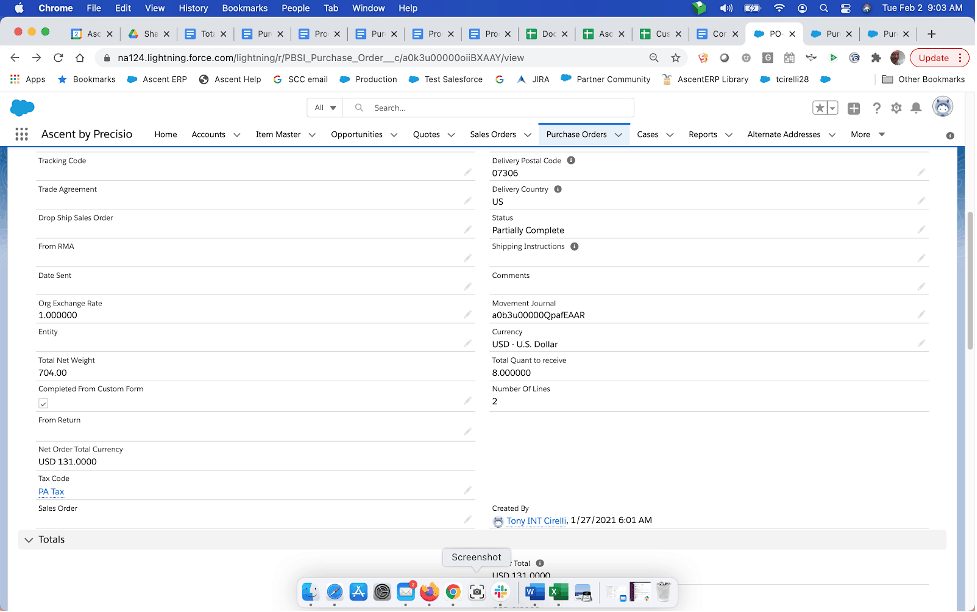
- Tracking Code – you can manually enter the tracking code assigned by a freight carrier for this purchase order.
- Trade Agreement – this is the trade agreement associated with the vendor on this purchase order. If the vendor has a trade agreement at the “Order” level, it will be defaulted to.
- Drop Ship Sales Order – if this purchase order is type “Drop Ship”, then this field contains the sale order which resulted in the creation of this purchase order.
- From RMA – if this purchase order was created as a result of action taken on an RMA/Case, then this would be that RMA/Case.
- Date Sent – this would be the date your company sent the purchase order to your vendor. It is manually entered.
- Org Exchange Rate – this would be the rate used if the default currency is different from the currency on this PO.
- Entity – if entities are used, this would be the entity selected for this purchase order. It must exist on the entity table.
- Total Net Weight – this is the sum of all PO line items’ net weight. The net weight comes from the Item Master object. This formula for each line is Quantity Ordered * Net Weight (from the PO Line, which can be defaulted to from the Item Master or can be manually entered via edit on the PO line).
- Completed From Custom Form – this field is used by Ascent developers only, and should not be used by customers.
- From Return – if this purchase order was created as a result of action taken on a return, then this would be that return.
- Net Order Total Currency – this field is typically the same value as Net Order Totals, unless the currency of the order changes, which would not change the value of this field. Refer to Net Order Total for a fair evaluation of the order, not this field. It might be appropriate to have the systems administrator remove this field from the page layout.
- Tax Code – this would be the tax code associated with the vendor on this PO. It can also be manually entered, or deleted from the PO if one was filled in.
- Sales Order – manually entered.
- Delivery Location – this is manually entered/selected, and is the delivery location (internal) for this purchase order. If it is entered/selected, then you will be able to receive only to this location.
- Delivery Account – on the creation of a NEW purchase order, an account can be selected via this field, and it will result in the Delivery Company, Street, Street Line 2, Delivery City,Delivery State, Delivery Postal Code, and Delivery Country being filled in with data from the account selected. Also, if this purchase order is a drop ship PO, then the Delivery Account will be the customer from the originating sales order.
- Delivery Account Address – once you select the Delivery Account, then you can select the Delivery Account Address appropriate for this PO. Then, once you have saved the PO, Ascent will take the address you saved under the Delivery Account Address and put it on the PO.
- Delivery Company – if no Delivery Account is entered, then this field will be filled in with the Organization Name from the Company Information record. If a Delivery Account is chosen upon creation of a NEW purchase order, then this will be filled in with the Account Name.
- Delivery Street – the street address of where the material will be shipped.
- Delivery Street Line 2 – second line of street address.
- Delivery City – the city where the material will be shipped.
- Delivery State – the state where the material will be shipped.
- Delivery Postal Code – the postal code where the material will be shipped.
- Delivery Country – the country where the material will be shipped.
- Status – there are multiple statuses for a purchase order:
- Open – PO has been created and there has been no receiving activity against it.
- Partially Complete – there has been some receiving activity against this PO.
- Complete – this PO has been received or completed in full.
- Cancelled – this will cancel the purchase order. Any items on the PO will have their Quantity on Order reduced by the quantity remaining to be received. Cancelled and Closed perform the same activity – the difference being how each work is perceived by the user.
- Closed – this will close the purchase order. Any items on the PO will have their Quantity on Order reduced by the quantity remaining to be received. Cancelled and Closed perform the same activity – the difference being how each work is perceived by the user.
- Shipping Instructions – manually entered, this field contains shipping instructions, which will appear on the purchase order.
- Comments – manually entered, this field contains miscellaneous comments, which will appear on the purchase order.
- Movement Journal – this is the ID of the movement journal, which contains links to each receiving movement line.
- Currency – this is the currency of this PO, which could differ from the ORG’s currency.
- Total Quant to receive – this is the sum of all quantities left to receive on this PO. If the order has been cancelled or closed, there would be no quantity left to receive.
- Order Total or Order Total(4) – either of these fields are the sum of the Total Price or Total Price(4) fields on the purchase order line.
- Standard Discount – this is a percentage field, which can be manually entered or filled in automatically if the Trade Agreement on the PO has a discount percentage.
- Discount Amount – Order Total – (Order Total * Standard Discount * .01).
- Discount Amount(4) – Order Total(4) – (Order Total(4) * Standard Discount * .01).
- Net Order Total = Order Total – Discount Amount.
- Net Order Total(4) = Order Total(4) – Discount Amount(4)
- Freight Amount – this is a manually entered field, which would be the freight amount either quoted by the vendor or the anticipated freight amount
- Freight Tax – manually entered.
- Total Weight Based Fees – manually entered.
- Total Price Based Fees – manually entered.
- Sales Tax % – manually entered.
- Total Line Tax – sum of purchase order line tax amounts.
- Total Tax- sum of Total Line Tax and Total Freight Tax.
- Final Order Total = Net Order Total + Freight Amount + Total Tax.

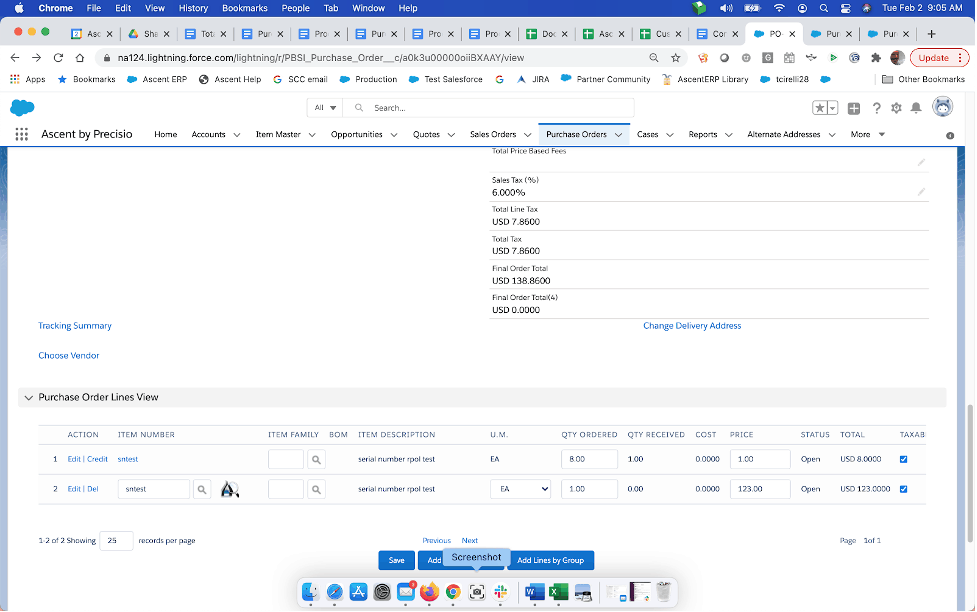
Purchase Order Line Creation:
There are multiple purchase order lines views that can be used. One is the standard viewPO, which is not customizable. The other is viewPOwithFieldSet. This option affords the company with the ability to move fields around, add fields and remove fields from the PO line display. This document will review both.
First, viewPO. This is the function that allows you to add/change/delete purchase order lines on the PO. The buttons at the bottom of the viewPO screen are:
- Save – once a PO line is added, edited, or deleted, you will hit the “Save” button to permanently save the activity that just took place.
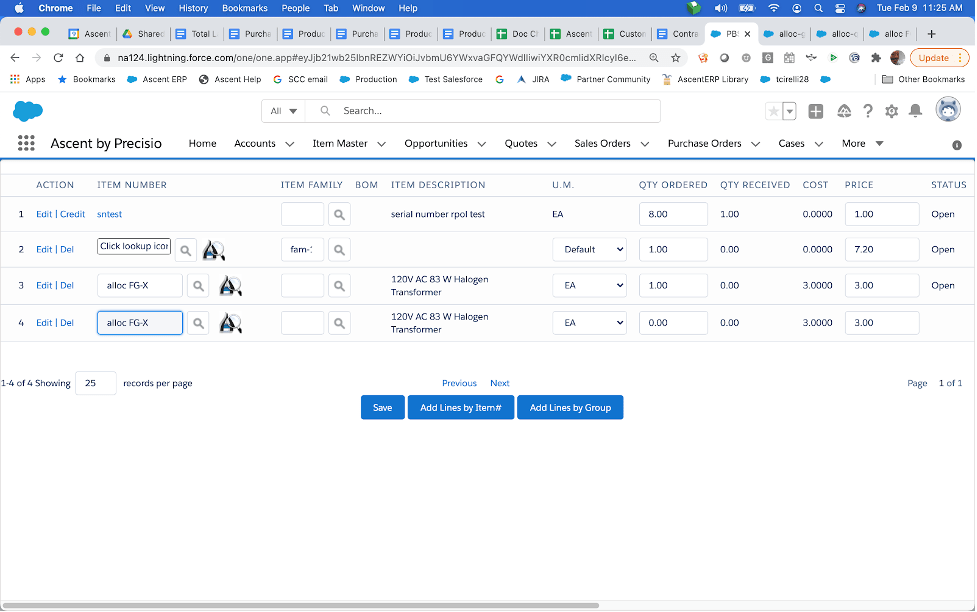
- Add Lines by Item – this will display fields for entry, to create a new purchase order line. If you click this, you will be prompted with a new PO line. You must select an item, so you can click on the standard Salesforce magnifying glass icon and get this display, which allows you to manually enter part/all of the item name (if the Name radial button is highlighted) OR if the All Fields radial button is highlighted, part/all of any other field on the item master.
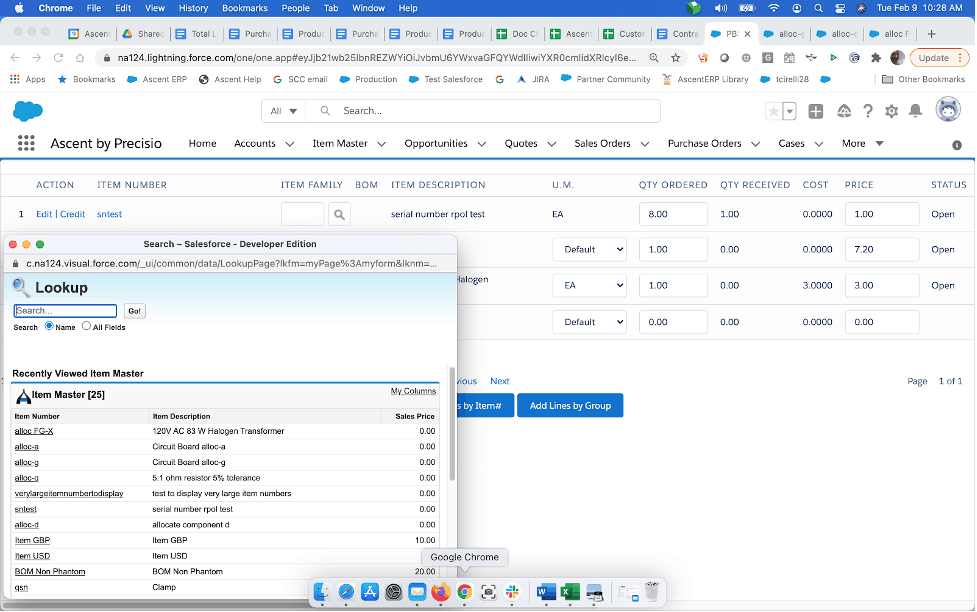
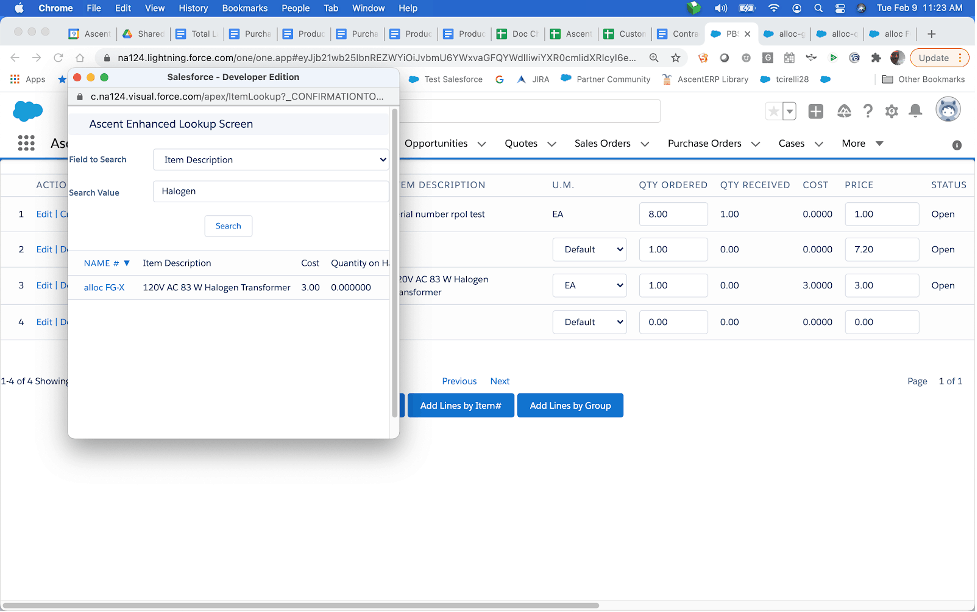
- Or, you can click on the Ascent search icon (looks like a fancy letter “A”), and enter some value in the search field, which would search by any part of the description:
- Additionally, you could click on the Field to Search drop down box, and select which field on the Ascent Item Master you’d like to search to select your item. Once you find it, click on the Name field, and it will be brought to the viewPO screen.
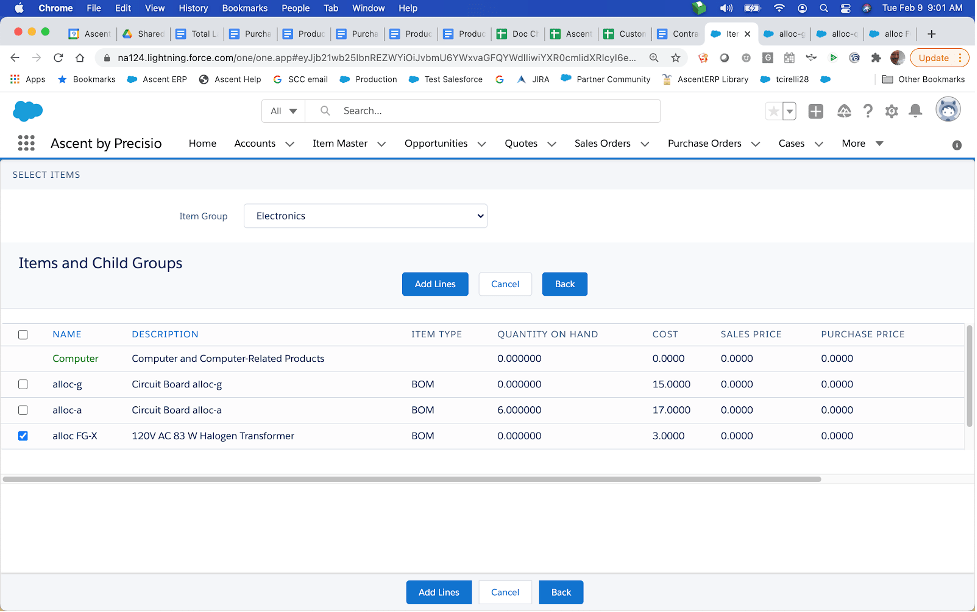
- Add Lines by Group – if you click this, then you will be prompted to select from a list of item groups. You will be shown items that fall into the item group you selected, as well as any item groups whose parent item group is in this list. In our example, the item-group-within-an-item-group is Computer. By clicking this, you will get this display:

- You can now select any or none of the items in the list. If you do, they will be added to the list of items to be added to the purchase order.

- For this example, we are only going to select one item. Click the box next to the item to select it:
- You can then hit “Save” and the system will bring you to the Purchase Order Lines screen again, where you can change the quantity and the price:

There are two (2) fields that can be entered after selecting the item:
- Quantity Ordered – this would be equal to the quantity you wish the vendor/supplier to provide to you
- Price – this price can be derived from several sources:
- Trade Agreements – this functionality allows you to set up agreed-upon purchase prices and have it automatically populate the price, based on the vendor on the purchase order and the item selected. Please refer to the Trade Agreement documentation for a full explanation of this functionality
- Item Master – the Cost or Cost(4) field on the item master could also be used, if there exists no trade agreement and if the custom setting Use Item’s Cost in Purchase Order Lines is selected.
- Manually entered
There is an “Action” field to the left of the item name. Possible buttons to click are:
- Edit – allows you to change the Quantity Ordered or the Price.
- Credit – with this option, you can reverse the receipt. If you’ve received a quantity of 4, and you hit credit, it will reverse that quantity and bring it to 0. You cannot partially credit a line. It is all or nothing at all.
- Del – delete this line. You cannot delete a line if it has been received or partially received