Rental Orders – Creation
Overview
This document will serve as an overview of the functionality available via Ascent Rental Sales Orders to create a rental sales order.
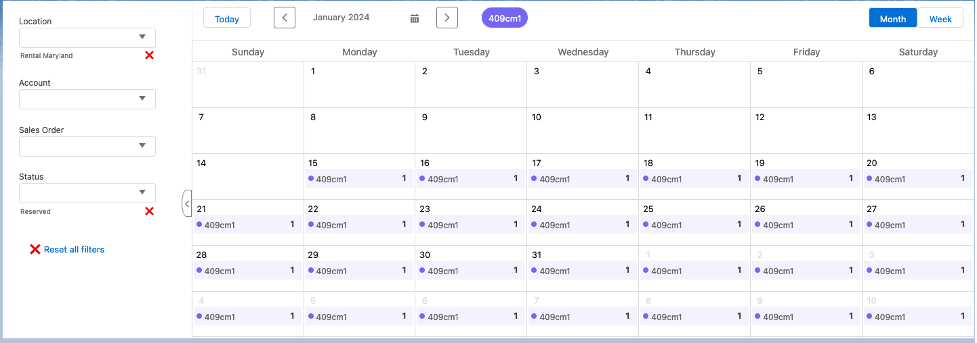
Definition: Sales Orders are records in Ascent that serve as a framework for selling and shipping material that is in inventory, as well as invoicing for that material. However, those same constructs (in addition to some more) are able to be used to rent (or loan) material to clients. Rental order lines can be reserved through Dated Item Reservations (separate document available outlining this process), staged, and re-staged (Staging and Re-Staging rental sales orders documented elsewhere in detail). Then, they can be packed, however, the packing does not convey ownership to the client. It merely moves the material from the rental inventory location to the customer’s location (or a venue location, see additional documentation discussing that in detail). And once the customer is done with the rental, it can be returned back to rental inventory, available for the net customer rental.
Some companies use rental sales orders not only to rent material to a customer, but also to sell material. For example, a company that rents tables and chairs, which are durable goods and can be rented over and over again, may also sell napkins, plastic cutlery, and plastic cups.
If a sales order line cannot be shipped due to inadequate inventory available, as long as ‘Allow for Drop Ship?’ Has been selected on the item master, then this sales order line can result in a drop ship purchase order. This will result in a supplier shipping that customer’s requested material directly, obviating the need for that material to come to your stocking location and be shipped from there. A purchase order is created and material received or completed against that instead.
Shipped (also called Packed) Sales Order Lines get created when you actually pack out a sales order. Packing out a sales order using the function Pack Order, relieves inventory for sales items, and moves inventory from a rental location to a customer rental location for rental line items..
Sales Orders can be created as a result of processing returns of RMAs (return material authorization), with the need to ship replacement material to the client. This only applies to sales line items.
Rental Sales Orders can also be created as a result of converting opportunities to quotes, then to sales orders. Equally this is applicable for converting opportunities to sales orders, or converting quotes to sales orders.
Custom Settings of Importance: There are a number of custom settings which can affect how a rental sales order works. Some of them will be outlined here. A few are discussed later on in the body of this document. To see all possible custom settings, please review the Ascent Rentals Custom Settings document.
- Use Not Counted Loc on Receive and Pack – this allows not counted in inventory locations, like rental locations, to be used to receive into and pack from on a rental sales order
- Use Returns – this would allow the system to use Returns on rentals, used in conjunction with the previous custom setting. It would obviate the use of purchase orders and purchase order lines on rental returns.
- Blank out Account on SNT receive – after a serialized item has been returned, the Customer Account designation will be blanked out on the serial number tracker (SNT) record.
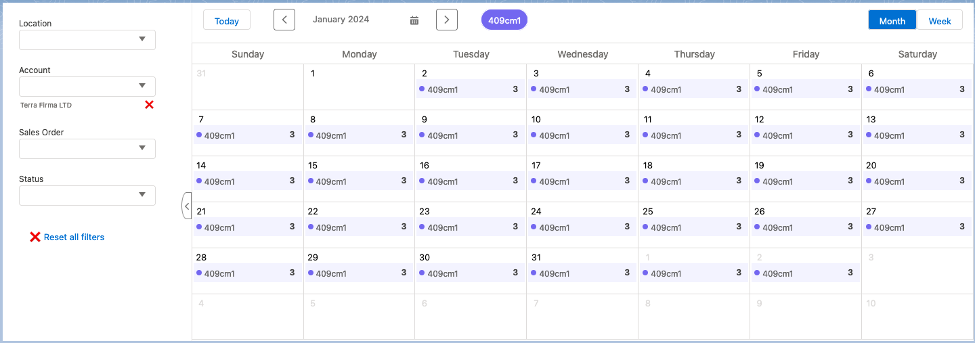
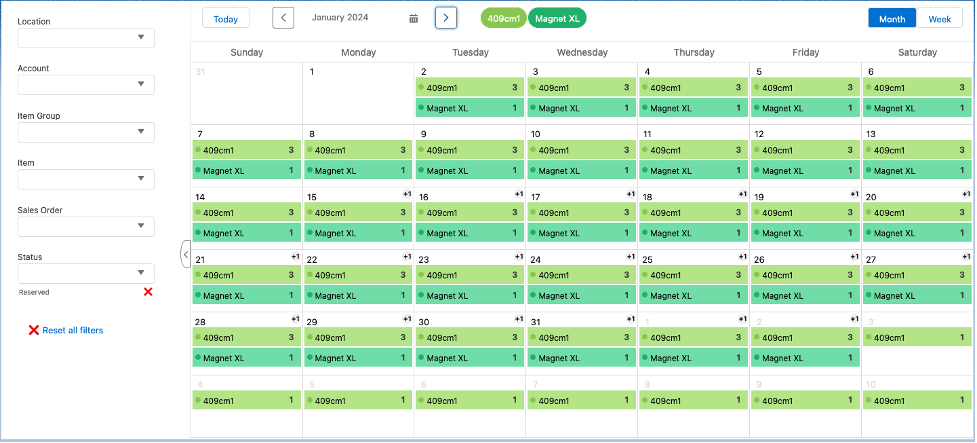
- Use Dated Item Reservations – the functionality gained by this custom setting:
- Inventory gets a Date Out and Date In
- Reserves inventory for a certain date range
- Reserving inventory only happens for the rental lines
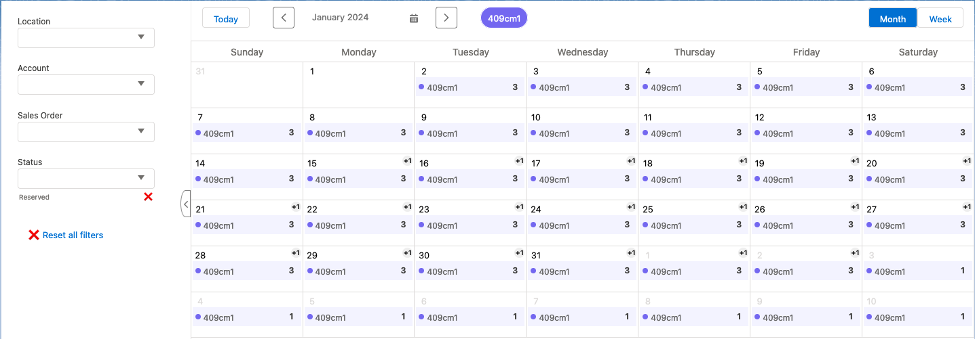
- Dated ATP (Available to Promise) – can request if inventory will be available for a date range in the future, and how much is available at that time based on the “Date Out” and “Date In” for a specific item.
- Allow Pack from Customer Rental Location – normally, you cannot pack material out from a customer rental location. However, if the customer to whom material has been rented is near another customer who is awaiting the same material, enabling this custom setting would allow the material to be packed directly from one customer rental location to another customer rental location. This would be particularly useful for event, daily, or weekly rentals, where the time in between rentals needs to be very short.
- Loan Rental Orders get zero price – if the rental order has a purpose of Loan, then all rental lines will get a zero price.
- Order Return Date Add/Subtract Days – when calculating the return date, the number that is entered here (positive or negative) is used to add/subtract that number of days to arrive at the return date.
- Do Not Show QOH on QR Views – activating this custom setting will inhibit the display of quantity on hand on rental views.
- Use Venue on Pack Order – Venue Location is a field on the rental order header. If this custom setting is selected and you fill in this field on the sales order, then the location which the material will be transferred on Ascent to is a concatenation of the Venue Location and the account name. For example, if the Venue Location is Herbert Plant, and the account is Acme, the new location will be named Herbert Plant/Acme. Of course, in this instance, Herbert Plant will need to have been previously created as a valid rental location.
In addition to the rental specific custom settings, there are custom settings that can apply to the sales lines. Those can be seen in the Ascent Sales Order – Creation document.
Process
To create a Rental Sales Order, go to the tab labeled “Sales Orders” and click “New”. The following fields are available for entry, based on what your company has chosen to expose for use:
Rental/Sales Order Detail
Rental/Sales Order Header information
- Sales Order #: This is assigned by Ascent. It has a prefix, SO-, followed by a 6 digit number. The number is an odometer, meaning that it has 1 added to it for each new SO created. This field is an autonumber field, managed by Salesforce.
- Order Date: The date this sales order was created, by default. It can be manually added or overridden.
- Ship Date: The ship date of this sales order. This defaults to today’s date plus 4. There are several ways that this field can be populated:
- Custom Setting – Do not populate SO Ship Date by default – the +4 will not be used. You would manually key in the Ship Date when adding a NEW sales order.
- Custom Setting – SO Ship Date Defaults to Today + – when adding a new sales order, the Ship Date can be made equal to the Order Date plus whatever value you place in that custom setting field.
- Custom Setting – Update Ship Date on each shipment – every time a sales order line is packed, the ship date field will be updated with today’s date.
- Custom Setting – Update Ship Date when all Lines Shipped – when the order is closed due to all lines having been shipped/packed, then the date on which that occurred will populate the Ship Date field.
- From Opportunity – if filled in, then this is the originating opportunity from which this order was created.
- From Quote – if filled in, then this is the originating quote from which this order was created.
- Customer Account – The account or this sales order.
- Customer Contact – The contact selected for the customer for this sales order.
- Contact Email – The email address for this customer contact.
- Venue Location – A venue is a physical location, possibly where an event is occurring. A company could have a client who is a consistent renter of goods, and oftentimes, the same goods or the same time period, but at different locations, and they wish to know what goods are currently being rented by their client and where they are. Using a Venue Location on the rental order header will allow that.
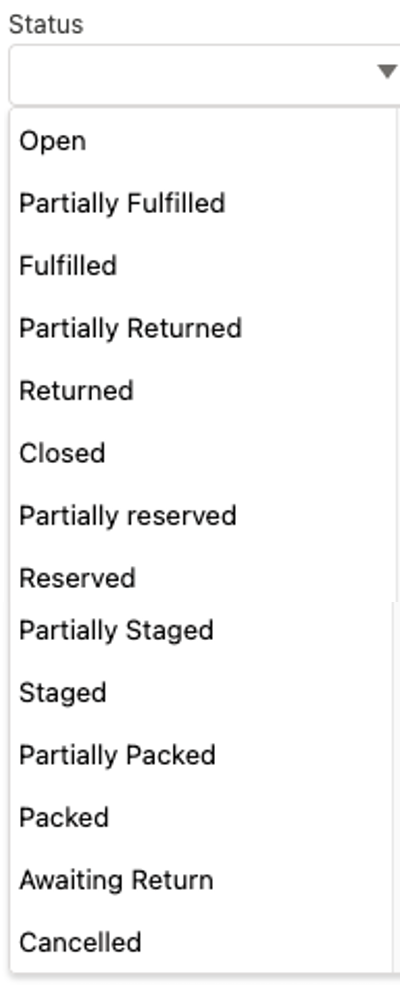
- Status – There are multiple statuses:
- Open – when an order is first created, it is set to Open
- Partially Complete – the status gets set to this when you have packed some lines and/or quantities on lines, but there still remains quantities or lines to fully pack.
- Closed – when the order is fully packed, the status changes to closed. Additionally, if there are still quantities to be packed on this sales order, the user can change the status to closed indicating that this order has finished processing, no more work to be done with it.
- In Progress – this value is not automatically set or used by Ascent, however, some companies choose to use it for their own purposes.
- Cancelled – the user can manually set this field to this value if the customer has cancelled the order.
- Packed – this value is not automatically set or used by Ascent, however, some companies choose to use it for their own purposes.
- Staged – this value is not automatically set or used by Ascent, however, some companies choose to use it for their own purposes.
- Customer PO # – Manually entered customer purchase order number.
- Mode of Delivery – There is a picklist with multiple options from which to choose, however, your systems administrator can add, subtract, or modify any of the selections from this picklist.
- None
- FedEx
- UPS
- Roadway
- USPS
- Other
- Tracking Code – You can manually enter the tracking code assigned by a freight carrier for this purchase order.
- Comments – This field contains any manually entered comments on this sales order. These comments are initially set to “Thank you for your order” but can be changed. These comments print on the pack slip, shipping confirmation, and invoice.
- Terms Conditions – these can be manually entered and can be printed on customer facing documents.
- Refund Amount – the amount of the refine, manually entered
- Reason for Refund – self explanatory
- Packing Date – This gets updated every time a line on the sales order is packed. It is overwritten every time.
- Order Purpose – this field determines what the purpose of this order is.
- Sale – this order is used exclusively for sales lines. No rental items can be used.
- Rent – this order is used exclusively for rental lines. No sales items can be used.
- Loan – this order is used to loan (rent – which assigns a zero price to all lines on the order) items out to a customer.
- Combined – this order purpose allows you to sell material to a customer as well as rent material.
- Re-Rental Return Order – this type of order gets created if:
- If on Rental Master, there is a shortage, and you choose Create RPO; that will create a purchase order with a Purchase Order Purpose of Rental Order.
- You receive that Rental Order Purchase Order, which assumes that this inventory is going to be used temporarily; your company has a shortage, and you choose to rent that material from a “friendly neighborhood competitor”
- Upon receiving it, a new sales order gets created with an Order Purpose of Re-Rental Return Order.
- Once you ship the material and the customer returns it, you can ship it back to your friendly neighborhood competitor using the sales order with the Order Purpose of Re-Rental Return Order.
- Return Problem – no currently used
- Entity – If entities are being used in your ORG, this is where you would select what entity this sales order is for.
- Total Quant To Ship – the sum of all sales lines quantities to ship. This field is calculated.
- Shipping Instructions
- Trade Agreement
- Payment Terms – manually entered payment terms for this order
- Gross Weight
- Net Order Total
- Standard Discount %
- Sales Tax %
- Shipping Charged
- Shipping Discount %
- Final Order Total
- Type – Standard or Scheduled; accept Standard as the default
- Created By – this is the user who initially created this order
- From Location – this is the location used as the default when packing out sales line items
- Final Tax Total
- Total Line Tax
- Movement Journal
- From Return – if this order was created as a result of a return line having been processed with a type of Replacement or Replace-From Order.


Rental Information
- QR Period – this determines the type of billing that this rental order required. This, combined with the QR Duration and QR Delivery Date Out, determines what the QR Return Date will be. The basics of rental pricing can be obtained by viewing Rental Trade Agreement documentation. In addition, we will illustrate how several of these Periods work by setting up several rental sales orders later on in this document.

- QR Duration – this is a numeric field, and used to calculate the total length of the rental period. Here is an example. If the QR Period is Weekly, and the QR Delivery Date Out is 01/01/2022, and the QR Duration is 3, then the QR Return Date In will be 01/22/2022.
- QR Delivery Date Out – this field is where the Date the material to be rented is to be shipped out to be shipped out to the client.
- QR Return Date In – this is a calculated field based on the values of QR Duration and QR Delivery Date Out
- QR Event Start Date – if the QR Period is “Event” then this date is important. It is the date when the event is scheduled to start. Note that this field is enterable. It is not calculated.
- QR Event End Date – if the QR Period is “Event”, then this date is important. It is the date when the event is scheduled to end. Note that this field is enterable. It is not calculated.
- QR Return Condition –
- QR From Location – this is a search field, and the location from which the rental lines are to be packed.
- Rental Status – when a rental order is initially entered, the status is blank. Then, when it has been packed, the status changes to Awaiting Return. If a return line has been partially returned, the status changes to Incomplete Return. Once all lines have been returned, the status changes to Return Completed.
- Rental Purchase Order – this would be the purchase order number for the return if you have chosen, via custom settings, to NOT activate “Use Returns Instead of POs for Rentals”
- Rental Lines Count – the total number of lines on this order that have a Purpose equal to Rent
- Rental Total Qty Needed – this is the sum of all rental lines quantity needed
- Rental Total Qty Shipped – this is the sum of all rental lines quantity packed/shipped
- Pay In Full Upfront – this checkbox indicates that this rental order needs to be paid in full up front before the material is shipped.
Address Information
Billing Company – The account for whom this sales order is for.
- Billing Street – Street address of the billing company.
- Billing City – City of the billing company.
- Billing State / Province – State or province of the billing company.
- Billing Zip / Postal Code – Zip code of the billing company.
- Billing Country – Country of the billing company.
- Delivery Address Type – This is a picklist, values are Contact Mailing and Account Shipping (default).
- Address Tracker – If the account on this sales order has multiple address trackers set up for it, then one of them can be selected. If that occurs, then the Delivery Address information will be filled in from the address tracker selected.
- Delivery Company – The name of the company where the material is to be delivered.
- Delivery ATTN to – Manually entered, this is the person to whom the material should be delivered to.
- Delivery ATTN Phone – The phone number of the Delivery ATTN to.
- Delivery Address (line 1) – First line of the delivery address.
- Delivery Address (line 2) – Second line of the delivery address.
- Delivery Address (line 3) – Third line of the delivery address.
- Delivery City – City where the delivery will be made.
- Delivery State – State where delivery will be made.
- Delivery Postal Code – Postal code where the delivery will be made.
- Delivery Country – Country where the delivery will be made.
- Ship To Location – If custom setting Use Ship Loc for Delivery Address is enabled and a location is selected in this field, then the delivery address information will be populated with the location address information.
Rental/Sales Order Line Creation:
Rental Sales Orders can have two types of lines on them, based on what the Order Purpose is. If the Order Purpose is Combined, then both Sales Lines and Rental Lines can be in the order. If the Order Purpose is Rent, then only rental lines can be on the order. There would be no prompts for adding Sales Lines. If the Order Purpose is Sale, then only Sales Lines can be on the order. There would be no prompt for adding Rental Lines.
- Sales Lines – these lines are intended for those situations where material is sold to a customer, not rented. Ownership passes to the customer.
- Rental Lines – these lines are intended for those situations where material is to be rented (or loaned) to a customer and even those possession changes, ownership of the material never does. The material is expected to be returned.
Rental Order Lines. This is a function that allows you to add, change, or delete rental order lines on the SO. The buttons at the bottom of this section are:
- Save – once an SO line is added, edited, or deleted, you will hit the “Save” button to permanently save the activity that just took place.
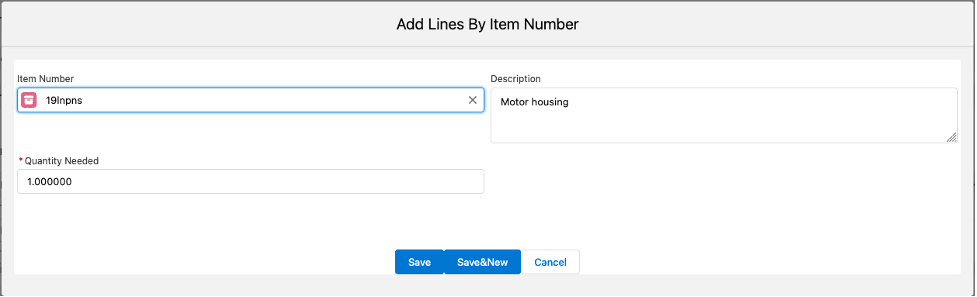
- Add Lines by Item Number – this will display fields for entry, to create a new rental sales order line. If you click this, you will be prompted with a new SO line. You must select an item, so you can click on the standard Salesforce magnifying glass icon and get this display, which allows you to manually enter part/all of the item name:
You can enter a single character and the system will look for items with that character:
Now, let’s select one of the items:
We can hit save (or Save&New for another line). We can also change the quantity, if desired:
We can also select Add Lines By Group:
Scroll down until you see the item group you wish to search:
After selecting one, you’ll see the items within that item group:After selecting one, you’ll see the items within that item group:After selecting one, you’ll see the items within that item group:

Let’s check the one we wish to select (we can also select multiple items):
After hitting Add Lines, we get this:
Now, let’s hit Save:
We now get that new line added to our order. Let’s scroll to the right to see more of the lines:
The information you see regarding QR Period, QR Duration, QR Delivery Date Out and QR Return Date In cascade from the order header. The pricing comes from trade agreements. The Rental Qty on Hand is also displayed.
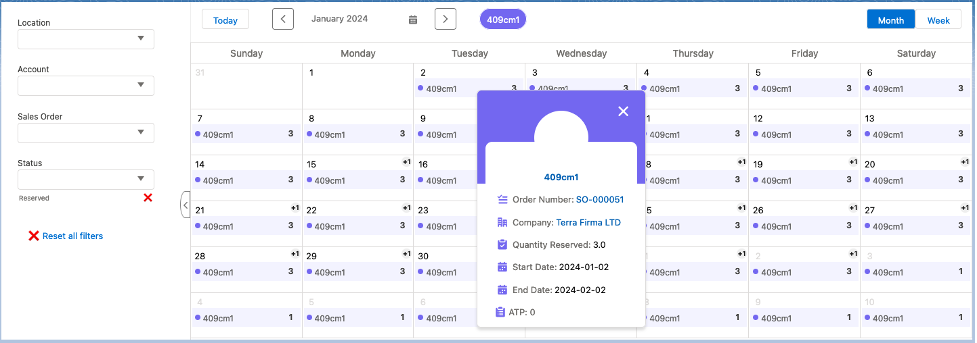
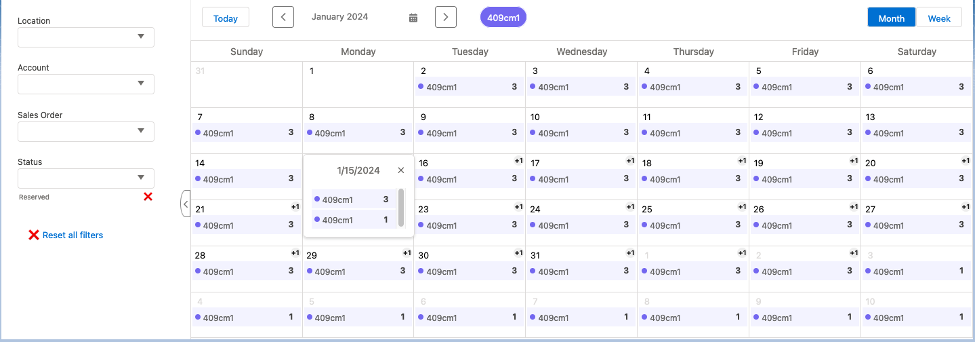
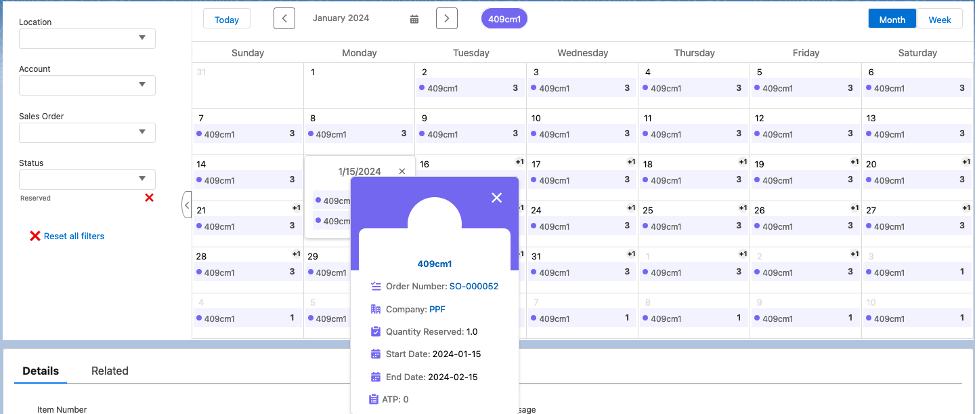
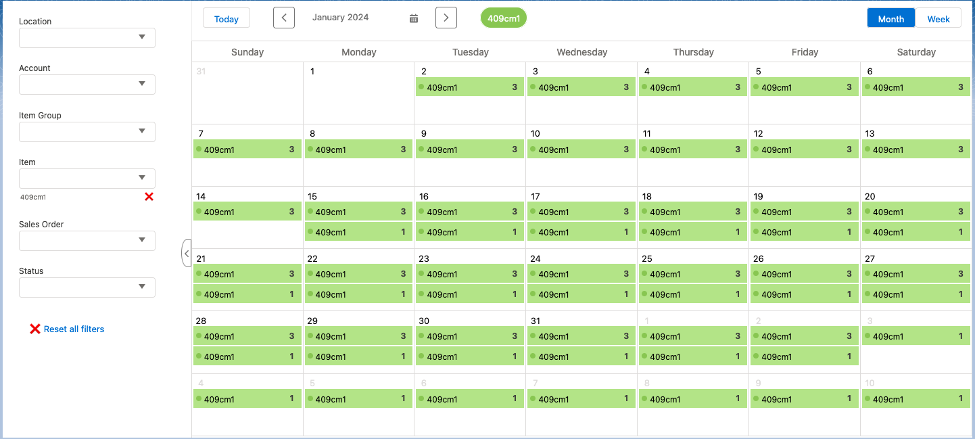
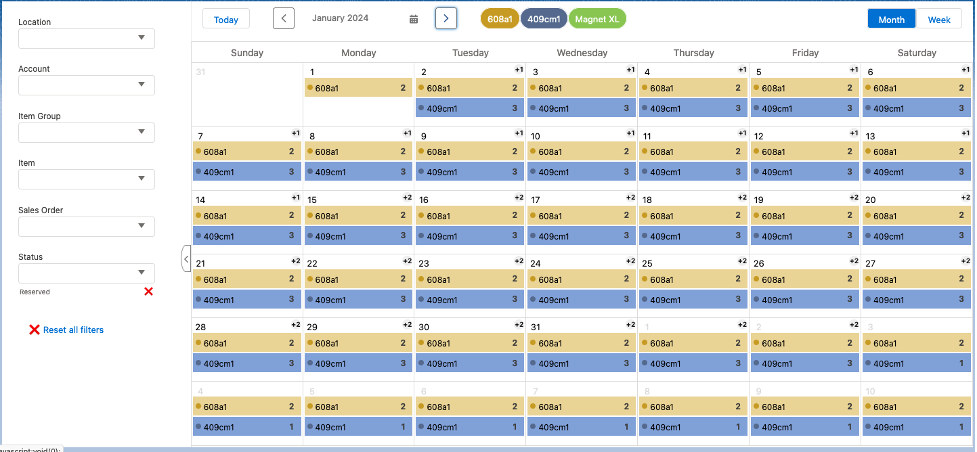
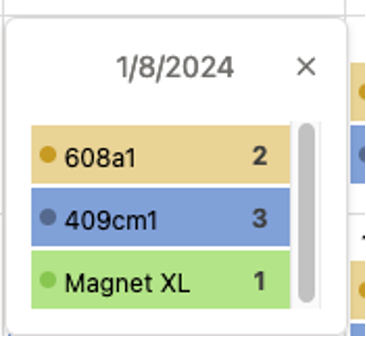
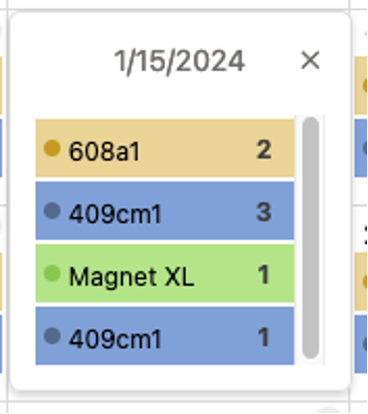
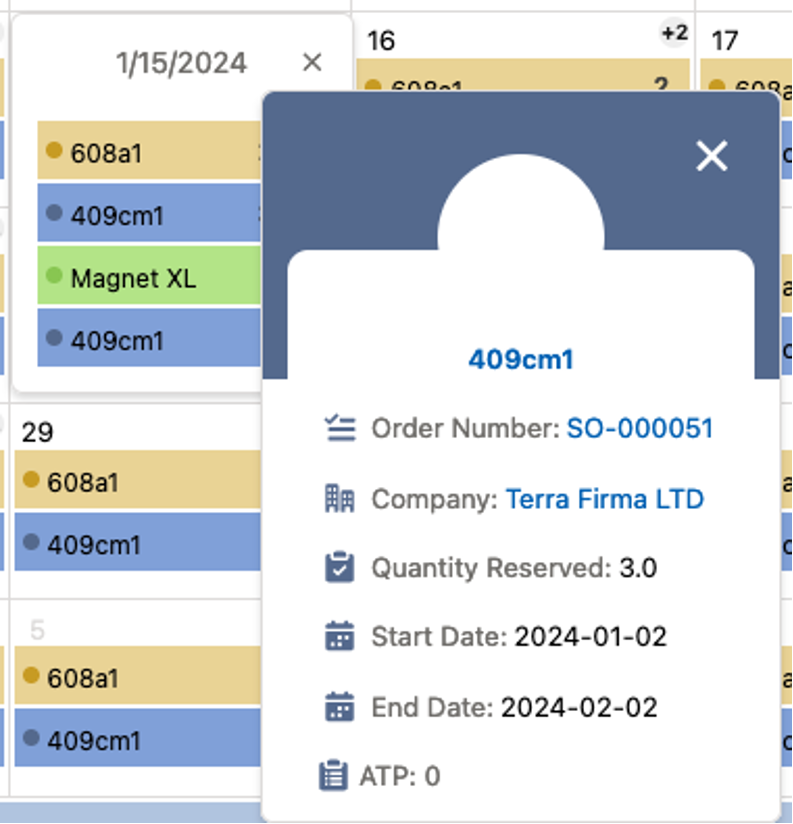
Additional record(s) can be created as a result of rental sales order creation, and that would be Dated Item Reservations. As a result of entering the three (3) rental lines these Dated Item Reservation records were created:

If dated item reservations have been enabled, Ascent will attempt to perform the reservation. Here is what the DIR looks like:
The above example illustrates that a quantity of 1 was requested (Requested Quantity), a quantity of 1 was reserved (Reserved Quantity), nothing was packed (Quantity Fulfilled), nothing was to be returned yet (Quantity to be Returned), and nothing was returned (Returned Quantity)
The Refresh DIR button is used when you wish the system to search inventory to see if there is adequate inventory to be reserved. An example would be if you enter a rental order line, and have the custom settings “Use Dated Item Reservations” enabled, and you don’t have adequate inventory available during the time frame referenced by Date Out and Date In, the system will not reserve it, and therefore, you cannot pack it. However, if inventory becomes available, you can then hit the Refresh DIR button, and Ascent will then attempt to reserve the material. If it has been made available for the time frame required, the material will now be reserved, and the Dated Item Reservation record will be updated and the material can now be packed out on the order.
Sales Order Lines. This is a function that allows you to add, change, or delete sales order lines on the SO. The buttons at the bottom of this section are:
- Save – once an SO line is added, edited, or deleted, you will hit the “Save” button to permanently save the activity that just took place.
- Add Lines by Item Number – this will display fields for entry, to create a new rental sales order line. If you click this, you will be prompted with a new SO line. You must select an item, so you can click on the standard Salesforce magnifying glass icon and get this display, which allows you to manually enter part/all of the item name:
The process is exactly the same as what was displayed for rental order lines, so let’s just select an item which has an item purpose of Both:
Once we save it, we’ll see it amongst the Sale Order Lines:

- Add Lines by Group works in the same manner as it does for rental lines, so we won’t re-illustrate it here.
There is one (1) field that is mandatory and can be entered after selecting the item: Qty Needed – this would be equal to the quantity your customer wishes to purchase.
Other fields can be entered (these are in no particular order):
-
- Unit of Measure – If the item has been set up to have multiple units of measure, then that can be selected here. Based on what gets selected, the Sales Price can be derived.
- Item Version – Ascent allows a user to create multiple version numbers for an item. Inventory is not segregated by item version. This is merely informational. You can select a version here, if one exists.
- Condition – This is a picklist, from which you can pick the following values:
- New
- Open Box
- Defective
- Damaged
- Incomplete
- Open Box
- B-Stock
- Trade Agreement – If there exists a Trade Agreement for the item, then this field would be populated with that TA name. The value can be overridden or removed.
- Tax Code – This is the tax code coming from the SO header, but can be manually entered.
- Sales Tax % – This is the sales tax percentage which is on the SO header, but can be manually entered.
- Tax – This would be the Sales Price times the Sales Tax %, but can be manually entered.
The Price field can be derived from several sources:
-
-
- Trade Agreements – This functionality allows you to set up agreed-upon purchase prices and have it automatically populate the price, based on the vendor on the purchase order and the item selected. Please refer to the Trade Agreement documentation for a full explanation of this functionality.
- Item Master – The Sales Price or Sales Price(4) field on the item master could also be used, if there exists no trade agreement and if the custom setting Use Item’s Cost in Purchase Order Lines is selected.
- Wholesale Price – If the custom setting Use Wholesale Price is selected, then this field can be populated with the Wholesale Price from the Item Master.
- Manually entered.
-
There are two fields to the left of the item name:
-
-
- Edit Line (this is an icon that looks like a piece of paper with a pencil) – allows you to change information on the SO line.
- Checkbox – with this option, you can reverse the pack, by checking this box and then selecting Reverse Pack, which is a button at the bottom of the viewSO page. If you’ve packed a quantity of 4, and you hit credit, it will reverse that quantity and bring it to 0. You cannot partially credit a line. It is all or nothing at all.
- Del – delete this line. If you select the Checkbox, then you can click the button at the bottom of the viewSO page to delete the line. You cannot delete a line if it has been received or partially received.
-