Sales Order – Creation
Overview
This document will serve as an overview of the functionality available via Sales Orders (SO) to create a sales order.
Definition: Sales Orders are records in Ascent that serve as a framework for selling and shipping material that is in inventory, as well as invoicing for that material. Sales order lines can be allocated, backordered, staged, and re-staged.
Sales Orders consist of:
– A Header Record (indicating who the customer is)
– Shipping Location
– Summary Price Information
– Tax information
– Any shipping Costs or Charges
– Sales Order Lines
– Quantity
– Price
If a sales order line cannot be shipped due to inadequate inventory available, as long as ‘Allow for Drop Ship?’ Has been selected on the item master, then this sales order line can result in a drop ship purchase order. This will result in a supplier shipping that customer’s requested material directly, obviating the need for that material to come to your stocking location and be shipped from there. A purchase order is created and material received or completed against that instead.
Shipped (also called Packed) Sales Order Lines get created when you actually pack out a sales order. Packing out a sales order using the function PackSO, relieves inventory.
Sales Orders can be created as a result of processing returns of RMAs (return material authorization), with the need to ship replacement material to the client.
Sales Orders can also be created as a result of converting opportunities to quotes, then to sales orders. Equally this is applicable for converting opportunities to sales orders, or converting quotes to sales orders. If those opportunities or quotes use Salesforce products, then with the implementation of ‘Ascent4Products’, those Salesforce opportunities and quotes can also be converted to Ascent sales orders.
Custom Settings of Importance: There are a number of custom settings which can affect how a sales order works. Some of them will be outlined here. A few are discussed later on in the body of this document. To see all possible custom settings, please review the Custom Settings document.
- Disable Trade Agreements for SO Lines – this would be used only if you wish for a Trade Agreement at the SO Header level to be utilized, and none at the line level.
- Do not close SO when all lines Packed – this would allow the sales order to remain in a Partially Complete status even if all lines are packed. Some companies will update this field based on soe event that occurs after packing/shipping.
- Show Discounted Price on SO Lines View – as opposed to showing the sales price
- Show Discount on SO Lines View VF Page – this would be useful to let the users know specifically what the discount on the sales price is.
- Update SO Line Location from SO Location – this will cause the SO Location to cascade down to each SO Line.
- Use SO Ship Date on SO Line – this will cause the Ship Date on the SO to cascade down to each SO Line.
- Apply Ship Cost before Sales Tax on SO – if this is enabled, then the Sales Tax will include the Shipping Charged.
- Calculate Tax at Line Items – if this is enabled, Ascent will use the field Total Tax Value (this is the sum of Tax Value at the SO Line level) and if not, Ascent will use Sales Tax to calculate the tax value.
- Use Tax Codes and Use Tax Rates – these are custom settings that affect how taxes are calculated on a sales order.
- Use SO Ship Loc for Delivery Address – this custom setting allows a user to select an internal location to be the delivery location on the sales order. It will override the Shipping Address from the account object.
Process
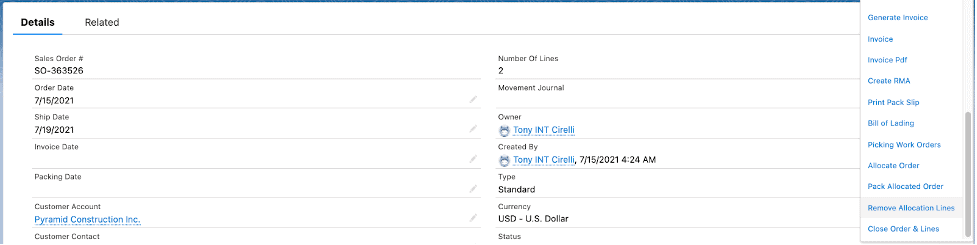
To create a Sales Order, go to the tab labeled “Sales Orders” and click “New”. The following fields are available for entry, based on what your company has chosen to expose for use:
Sales Order Detail
- Sales Order #: This is assigned by Ascent. It has a prefix, SO-, followed by a 6 digit number. The number is an odometer, meaning that it has 1 added to it for each new SO created. This field is an autonumber field, managed by Salesforce.
- Order Date: The date this sales order was created, by default. It can be manually added or overridden.
- Ship Date: The ship date of this sales order. This defaults to today’s date plus 4. There are several ways that this field can be populated:
- Custom Setting – Do not populate SO Ship Date by default – the +4 will not be used. You would manually key in the Ship Date when adding a NEW sales order.
- Custom Setting – SO Ship Date Defaults to Today + – when adding a new sales order, the Ship Date can be made equal to the Order Date plus whatever value you place in that custom setting field.
- Custom Setting – Update Ship Date on each shipment – every time a sales order line is packed, the ship date field will be updated with today’s date.
- Custom Setting – Update Ship Date when all Lines Shipped – when the order is closed due to all lines having been shipped/packed, then the date on which that occurred will populate the Ship Date field.
- Invoice Date – The date the last invoice was generated for this sales order
- Packing Date – This gets updated every time a line on the sales order is packed. It is overwritten every time.
- Customer Account – The account or this sales order.
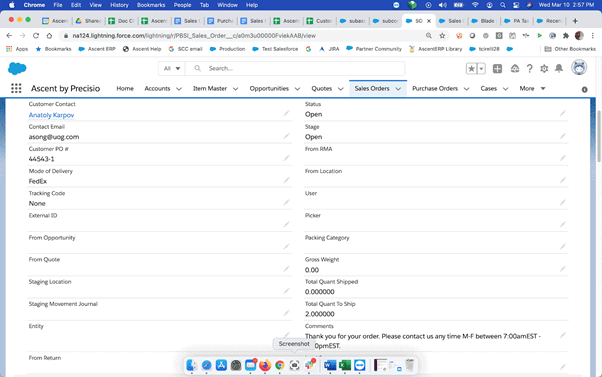
- Customer Contact – The contact selected for the customer for this sales order.
- Contact Email – The email address for this customer contact.
- Customer PO # – Manually entered customer purchase order number.
- Mode of Delivery – There is a picklist with multiple options from which to choose, however, your systems administrator can add, subtract, or modify any of the selections from this picklist.
- None
- FedEx
- UPS
- Roadway
- USPS
- Other
- Tracking Code – You can manually enter the tracking code assigned by a freight carrier for this purchase order.
- External ID – This is Salesforce assigned. It can be used when uploading sales orders from a foreign system.
- From Opportunity – If this sales order was converted from an opportunity or converted from a quote which was converted from an opportunity, then that opportunity name will populate this field.
- From Quote – If this sales order was converted from a quote, then the quote name will populate this field.
- Staging Location – When using staging, this field represents what staging location the staging process will move material to. If left blank, the staging location(s) can be selected from the staging screen on the sales order function. If no staging is required, leave this field blank.
- Staging Movement Journal – This is populated with the movement journal created when staging occurs
- Entity – If entities are being used in your ORG, this is where you would select what entity this sales order is for.
- From Return – If this sales order was created as a result of processing a return line, then this field will be populated with the return number.
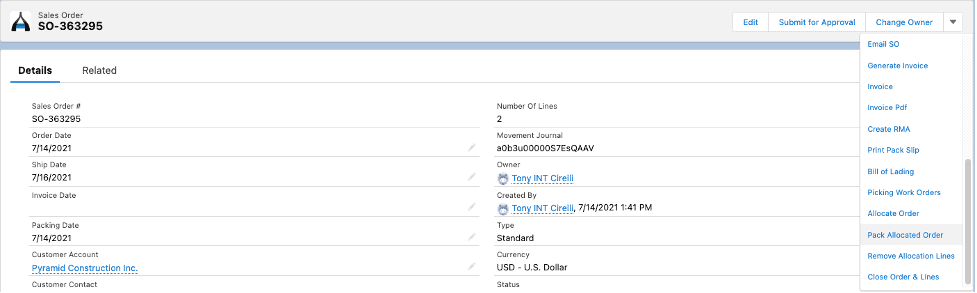
- Number of Lines – The number of lines on this sales order.
- Movement Journal – This field contains the movement journal number that is created upon packing out the order.
- Owner – The name of the person who owns this order.
- Created By: – The name of the person who created this order.
- Type – Standard; there is an additional type, Scheduled, however, it was developed in the infancy of Ascent and almost never used.
- Currency – This would be the currency of this sales order.
- Status – There are multiple statuses:
- Open – when an order is first created, it is set to Open
- Partially Complete – the status gets set to this when you have packed some lines and/or quantities on lines, but there still remains quantities or lines to fully pack.
- Closed – when the order is fully packed, the status changes to closed. Additionally, if there are still quantities to be packed on this sales order, the user can change the status to closed indicating that this order has finished processing, no more work to be done with it.
- In Progress – this value is not automatically set or used by Ascent, however, some companies choose to use it for their own purposes.
- Cancelled – the user can manually set this field to this value if the customer has cancelled the order.
- Packed – this value is not automatically set or used by Ascent, however, some companies choose to use it for their own purposes.
- Staged – this value is not automatically set or used by Ascent, however, some companies choose to use it for their own purposes.
- Stage – there are multiple stages:
- Open – when an order is first created, it is set to Open
- Partially Packed – when not all quantities on the sales order are packed, but some have been packed.
- Packed- when all quantities on the sales order have been packed.
- Waiting Pick Up – this value is not automatically set or used by Ascent, however, some companies choose to use it for their own purposes.
- On Route – this value is not automatically set or used by Ascent, however, some companies choose to use it for their own purposes.
- Delivered – this value is not automatically set or used by Ascent, however, some companies choose to use it for their own purposes.
- From RMA – If this sales order was created as a result of processing an RMA line, then this field will be populated with the RMA number.
- From Location – If this field is manually entered, then upon packing the sales order, the inventory in this location will be displayed first. However, if the custom setting “Force Packing by Location” is activated, then only inventory from this location will be displayed and available to be packed from.
- User – Not used by Ascent; can be manually entered by the user
- Picker – When custom setting Show only Picker sales orders on Mobile is enabled, and you assign this sales order to a picker, then when the picker logs into his Ascent Mobile Menu app
- Packing Category – This field contains two choices, LTL and Small Packages. This field is not used by Ascent, but a customer may use it and have the systems administrator update this picklist with whatever is appropriate for the company.
- Gross Weight – The sum of all gross weights from the sales order line
- Total Quant Shipped – The total quantity shipped/packed from each sales order line
- Total Quant to Ship – The remaining quantity to ship/pack on each sales order line
- Comments – This field contains any manually entered comments on this sales order. These comments are initially set to “Thank you for your order” but can be changed. These comments print on the pack slip, shipping confirmation, and invoice.
- Lead Source – A manually entered field, can be used to track the source of the lead that resulted in this sales order.

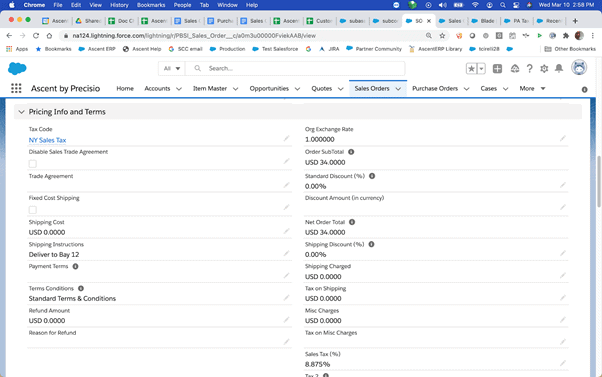
Pricing Info and Terms
- Tax Code – This tax code comes from the account. It can, however, be overridden.
- Disable Sales Trade Agreement – If this is checked, then any trade agreement that might apply to this sales order would be disabled. The sales order line prices would come from the item master sales price field or manually entered.
- Trade Agreement – This is the trade agreement (TA) assigned to this sales order. It can be a TA that is specifically associated with the account, or one that is associated with the account group that the account is part of. The account TA has precedence over the account group TA.
- Fixed Cost Shipping – If the order has a shipment tracker, and if this field is enabled, the when the invoice is generated, the shipment is taken from the shipping charged field.
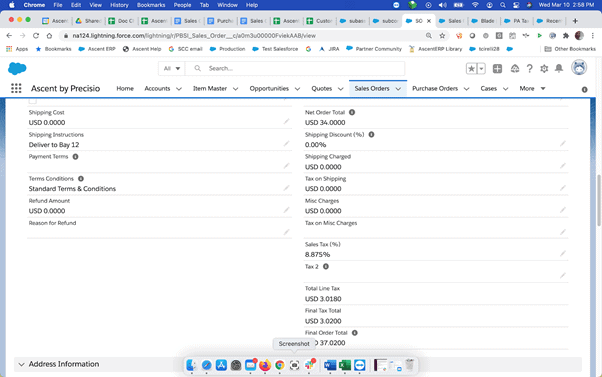
- Shipping Cost – This can be manually entered or can be updated through integration with other applications, such as ZenKraft ShipMate.
- Shipping Instructions – This field, manually enterable, contains shipping instructions, which print on the shipping confirmation, pack slip, invoice, and bill of lading.
- Payment Terms – The terms of payment.
- Terms Conditions – This field, manually enterable, appears on the pack slip, invoice, and bill of lading.
- Refund Amount – This manually enterable field can contain the refund amount against this sales order.
- Reason for Refund – If Refund Amount is populated, this would be the reason why
- Org Exchange Rate – This is the exchange rate if the sales order currency is different from the ORG’s currency.
- Order SubTotal – This is a formula field, which sums up all of the line items’ Total Discounted Price.
- Standard Discount % – Standard discount based on customer or account group trade agreement.
- Discount Amount (in currency) – Can be manually entered; NOTE: you cannot have both ‘Standard Discount(%)’ and ‘Discount Amount (in currency)’ applied on the Sales Order! If the ‘Discount Amount (in currency)’ is empty please make sure that it wasn’t applied before by checking ‘Invoiced Discount Amount’ field value.
- Net Order Total – This is a calculation, Order SubTotal – Standard Discount %.
- Shipping Discount % – If entered, this will be the discount percentage applied to the Shipping Charged field.
- Shipping Charged – This can be manually entered or as some Ascent customers have done, take the value from the Shipping Cost field and apply a mark-up percentage to it.
- Tax on Shipping – this is equal to the tax rate on the sales order times (Shipping Charged minus Shipping Discount %).
- Misc Charges – Miscellaneous charges not accounted for elsewhere on the sales order.
- Tax on Misc Charges – this is the sales tax calculated on the Misc Charges.
- Sales Tax % – this rate can be derived by two methods:
- Tax Code object – there is a tax rate % on this object. If Custom Setting Use Tax Code = “Y” and Use Tax Rates = “N”, then the Tax Rate % will be used to calculate the tax. Of course, the Tax Code must be filled in on the Sales Order header.
- Tax Code object – there is another tax rate % on the Tax Code object called Total Tax Rate. This field summarizes all Tax Rate % from every Tax Rate record that has the Sales Order header’s Tax Code in the Tax Code field.
Note: the tax can be either 10% or 29.90%, based on how you use the Tax Code and Tax Rate Custom Settings.
- Tax 2
- Total Line Tax
- Final Tax Total
- Final Order Total

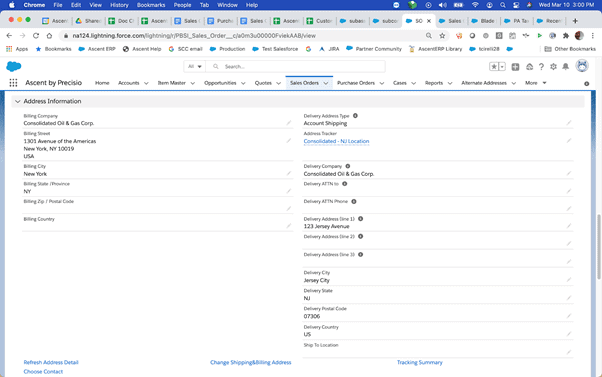
Address Information
- Billing Company – The account for whom this sales order is for.
- Billing Street – Street address of the billing company.
- Billing City – City of the billing company.
- Billing State / Province – State or province of the billing company.
- Billing Zip / Postal Code – Zip code of the billing company.
- Billing Country – Country of the billing company.
- Delivery Address Type – This is a picklist, values are Contact Mailing and Account Shipping (default).
- Address Tracker – If the account on this sales order has multiple address trackers set up for it, then one of them can be selected. If that occurs, then the Delivery Address information will be filled in from the address tracker selected.
- Delivery Company – The name of the company where the material is to be delivered.
- Delivery ATTN to – Manually entered, this is the person to whom the material should be delivered to.
- Delivery ATTN Phone – The phone number of the Delivery ATTN to.
- Delivery Address (line 1) – First line of the delivery address.
- Delivery Address (line 2) – Second line of the delivery address.
- Delivery Address (line 3) – Third line of the delivery address.
- Delivery City – City where the delivery will be made.
- Delivery State – State where delivery will be made.
- Delivery Postal Code – Postal code where the delivery will be made.
- Delivery Country – Country where the delivery will be made.
- Ship To Location – If custom setting Use Ship Loc for Delivery Address is enabled and a location is selected in this field, then the delivery address information will be populated with the location address information.
Sales Order Line Creation:
There are multiple sales order lines views that can be used. One is the standard viewSO, which is not customizable. Another is viewSOwithFieldSet. This option affords the company with the ability to move fields around, add fields and remove fields from the SO line display. This document will review both.
viewSO. This is a function that allows you to add, change, or delete purchase order lines on the SO. The buttons at the bottom of the viewSO screen are:
- Save – once an SO line is added, edited, or deleted, you will hit the “Save” button to permanently save the activity that just took place.
- Add Lines by Item – this will display fields for entry, to create a new purchase order line. If you click this, you will be prompted with a new SO line. You must select an item, so you can click on the standard Salesforce magnifying glass icon and get this display, which allows you to manually enter part/all of the item name (if the Name radial button is highlighted) OR if the All Fields radial button is highlighted, part/all of any other field on the item master.
Or, you can click on the Ascent search icon (looks like a fancy letter “A”), and enter some value in the search field, which would search by any part of the description:
Here’s what the SO line looks like with viewSO. Since there are many fields on it, this document displays all the columns in two screenshots:
There is one (1) field that is mandatory and can be entered after selecting the item: Qty Needed – this would be equal to the quantity your customer wishes to purchase.
Other fields can be entered:
- Unit of Measure – If the item has been set up to have multiple units of measure, then that can be selected here. Based on what gets selected, the Sales Price can be derived.
- Iem Version – Ascent allows a user to create multiple version numbers for an item. Inventory is not segregated by item version. This is merely informational. You can select a version here, if one exists.
- Condition – This is a picklist, from which you can pick the following values:
- New
- Open Box
- Defective
- Damaged
- Incomplete
- Open Box
- B-Stock
- Trade Agreement – If there exists a Trade Agreement for the item, then this field would be populated with that TA name. The value can be overridden or removed.
- Tax Code – This is the tax code coming from the SO header, but can be manually entered.
- Sales Tax % – This is the sales tax percentage which is on the SO header, but can be manually entered.
- Tax – This would be the Sales Price times the Sales Tax %, but can be manually entered.
The Price field can be derived from several sources:
- Trade Agreements – This functionality allows you to set up agreed-upon purchase prices and have it automatically populate the price, based on the vendor on the purchase order and the item selected. Please refer to the Trade Agreement documentation for a full explanation of this functionality.
- Item Master – The Sales Price or Sales Price(4) field on the item master could also be used, if there exists no trade agreement and if the custom setting Use Item’s Cost in Purchase Order Lines is selected.
- Wholesale Price – If the custom setting Use Wholesale Price is selected, then this field can be populated with the Wholesale Price from the Item Master.
- Manually entered.
There are two fields to the left of the item name:
- Edit Line (this is an icon that looks like a piece of paper with a pencil)- allows you to change information on the SO line.
- Checkbox – with this option, you can reverse the pack, by checking this box and then selecting Reverse Pack, which is a button at the bottom of the viewSO page. If you’ve packed a quantity of 4, and you hit credit, it will reverse that quantity and bring it to 0. You cannot partially credit a line. It is all or nothing at all.
- Del – delete this line. If you select the Checkbox, then you can click the button at the bottom of the viewSO page to delete the line. You cannot delete a line if it has been received or partially received.
Another way to add lines:
- Add Lines by Group – If you click this then you will be prompted to select from a list of item groups. You will be shown items that fall into the item group, as well as any item groups whose parent group is in this list In our example, the item-group-within-an-item-group is Computer. By clicking this you will get this display:
You can now select any or none of the items in the list. If you do, they will be added to the SO.
After hitting Save, the items get added to the Sales Order:
viewSOwithFieldSet: This is a function that allows you to add, change, or delete purchase order lines on the SO. The buttons at the bottom of the viewSOwithFieldSet screen are:
- Save – Once an SO line is added, edited, or deleted, you will hit the “Save” button to permanently save the activity that just took place.
- Add Lines by Item – This will display fields for entry, to create a new purchase order line. If you click this, you will be prompted with a new SO line. You must select an item, so you can click on the standard Salesforce magnifying glass icon and get this display, which allows you to manually enter part/all of the item name (if the Name radial button is highlighted) OR if the All Fields radial button is highlighted, part/all of any other field on the item master.
- Add Lines by Group – If you click this then you will be prompted to select from a list of item groups. You will be shown items that fall into the item group, as well as any item groups whose parent group is in this list.
Important note: Since this is a field set, your system administrator can change the order in which many of the fields display, can remove some fields from being displayed, and can add fields to this set. There are certain mandatory fields that cannot be removed, for example: Item Number, Item Description, and Qty Needed.
As with the viewSO, you can create a return RMA by clicking the left arrow near the end of the line, as well as clicking the ATP button, to calculate the available-to-promise. Those will be described in other documents.