How to Create Production Work Orders
Overview
This document will serve as an overview of the functionality available via Production Work Orders (PWO) to create a production work order.
Definition: Production Work Orders are transactions in Ascent that serve as a framework for building, assembling or manufacturing assemblies and consuming the material that goes into that process.
PWOs consist of a production work order and BOM Depletion Lines. The PWO is the process.
The PWO object contains information pertaining to the BOM being produced, start and end dates, quantity to build, quantity remaining, material movement journal names, and inventory locations, with the ability to extend these data points to fit your production process.
Typically, Production Work Orders are created through the use of the Ascent ERP Master Planner. For more information on how Master Planner calculates the demand for finished goods or sub-assemblies please refer to the article on Master Planner which can be found here: Click Here
Process: to create a PWO, go to the tab labeled “Production Work Orders” and click “New”. The following fields are available for entry/display, based on what your company has chosen to expose for use.
- Production Work Order Name – this is assigned by Ascent. It has a prefix, PWO-, followed by a 6 digit number. The number is an odometer, meaning that it has 1 added to it for each new PWO created. This field is an autonumber field, managed by Salesforce.
- Item Number – must be on the item master with an item type = “BOM” and BOM type = “BOM-non Phantom”.
- BOM – an item can have multiple BOMs associated with it, based on the custom setting “BOM Versioning Enabled” being selected. There is only 1 default BOM, and if this field is not chosen to be reviewed, then the default BOM will be chosen.
- Item Version – there is a related object on the item master where you can add components to the version. This is typically not used.
- Item Description – this comes directly from the item master item description field. It can be overridden, however, for this PWO.
- Quantity – this is the quantity to build.
- Quantity Left – this is the Quantity field minus the Quantity Built field.
- Actual Production Time(hours) – after completing the PWO, a user can manually enter values into this field
- Rate(per hour) – Manually entered; Ascent does not use this for any calculations.
- Labor Cost – Manually entered; Ascent does not use this for any calculations.
- Estimated Production Time – This is a calculated field, taking the Quantity field on this PWO times the Estimated Production Time, which comes from the item master, and is defined as days consumed for the item to be manufactured. It can be shown as two decimal places. If it takes 0.5 days to manufacture one of these items, and your Quantity field equals 5, then 2.5 will be displayed here.
- Estimated Labor Cost – This is the Estimated Production Time * Rate(per hour).
- Item Description(Long) – This field comes from an identically named field on the item master.
- Receipt Journal – This is the movement journal that is assigned to this PWO once any PWO completions/receipts are recorded. This will be for the item being completed. It will have as a related list, all the movement lines associated with receipts for this PWO.
- Issue Journal – This is the movement journal that is assigned to this PWO once any PWO. Completions / issues are recorded for the components being issued/consumed. It will have as a related list, all the movement lines associated with issues for this PWO.
- Allocation Movement Journal – This is the movement journal that is assigned to this pwo when/if any allocations are performed for the components. It will have as a related list, all movement lines that are created as a result of performing an allocation, associated with this PWO.
- Start Date – If this PWO is created by the Master Planner, then the Requested Date on Master Planner becomes the Start Date.
- Delivery Date – If this PWO is created by the Master Planner, then this field receives the value of the Delivery Date from the Master Planner.
- Department – This would be manually selected from the Department object.
- Production Work Order – This is a reference field only, Ascent does not use this.
- PWO Date – The date this production work order was created.
- Entity – This is the entity of the production work order. It can be left blank if entities are not used, or simply removed from the page layout.
- Org Exchange Rate – This would be the exchange rate for this PWO if different from the standard base currency of the ORG.
- Total Estimated Build Cost – This would be the Quantity times the item cost (or item cost(4) if 4 decimal place costs are used) field from the item master.
- Estimated Build Cost Per Qty – This would be the item cost (or item cost(4) if 4 decimal place costs are used) field from the item master.
- Non-Material Manufacturing Cost – Manually entered; Ascent does not use this for any calculations.
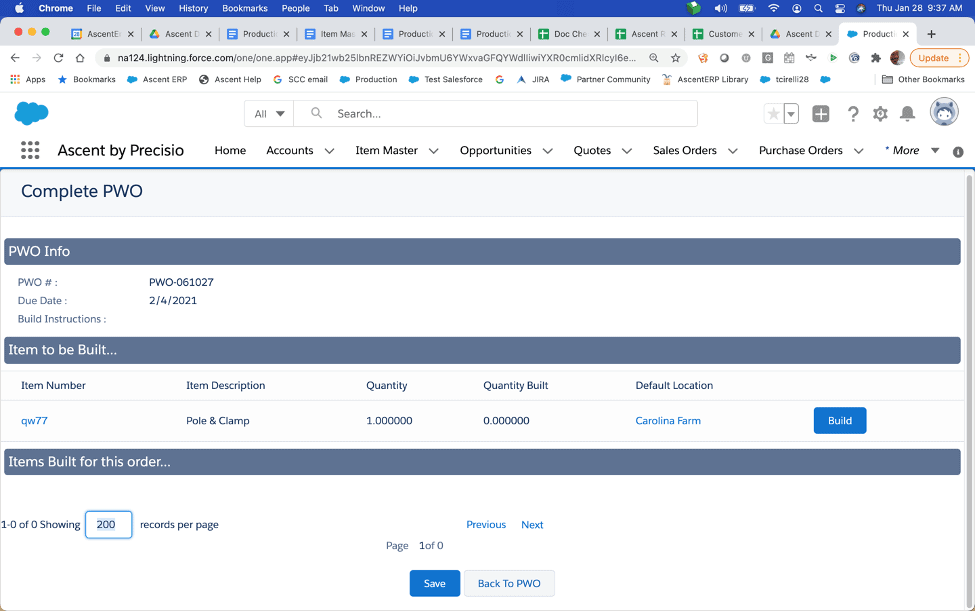
- Build Instructions – This manually entered field is normally used to contain instructions on how to build this PWO. It can include, for example, process routings, material handling instructions, or packaging instructions. Often, a company will copy instructions from another document into this field. These Build Instructions will print on the pick list, which can be obtained by clicking on View PWO.
- Status – Can be Open (brand new PWO, no activity against it), In Progress (can have allocations against it, partially completed, or set to In Progress is using FinancialForce to generate journals), and Complete (Quantity equals Quantity Built or manually set to Complete).
- Quantity Built – The quantity that has been completed/built on this PWO.
- Use Inventory from Location – If this is filled in with a valid location, then when performing the Build function after clicking the Complete PWO button, this location will be displayed first on the build screen for each BOM component for consumption. You can still override this unless the custom setting Force Complete PWO from Location is enabled.
- WIP Location – If this field is filled in with a valid location, then if you choose to perform Allocate PWO, the inventory which is allocated will be moved to this location.
- Lot -This is the lot used when performing the Complete PWO.
- Location – not used.
- Type – 4 values
- Production – This is the typical order. It is used to build an assembly using the components.
- Credit – This type is used when you wish to reverse out the entire production work order’s completed quantity. For example, if your PWO had a quantity to build of 10, but you completed 3, and now determine that these 3 were completed in error, you can select “Credit” and the inventory that was consumed will be put back in stock, and the completed quantity will be removed from stock. You cannot specify a quantity to be credited. This function will credit the total quantity completed. Serial numbers created will remain on file, however, will not be counted in stock. Serial number records of the components will now be recorded as being in stock.
- Reverse – Same as “Credit”, just a different name.
- dwo – Deconstruct Work Order – this type is used only when first creating a PWO. A PWO cannot start out as type = production and then be changed to this. A dwo is used when you wish to reverse/credit a specific quantity of assembled goods, whether those goods were made inhouse or whether they were returned from a customer. Sometimes, goods returned from a customer are not completely usable, so a tear down is required to salvage specific components/sub-assemblies, and scrap the remainder. On a dwo, you will be asked for the serial number being deconstructed (if the top level is serialized) and the components which are being put back into inventory’s serial numbers.
- Movement Journal ID – This points to the receipt journal ID.
- Starting Serial Number Prefix – This would be the prefix assigned to any serial numbers that are completed.
- Starting Serial Number – This would be the starting serial number when completing this PWO.
- Starting Serial Number Suffix – This would be the suffix assigned to any serial numbers that are completed.
- Serial Numbers To Receive – These are the serial numbers that are completed.
- Currency – If a multi-currency ORG, the currency of this PWO.

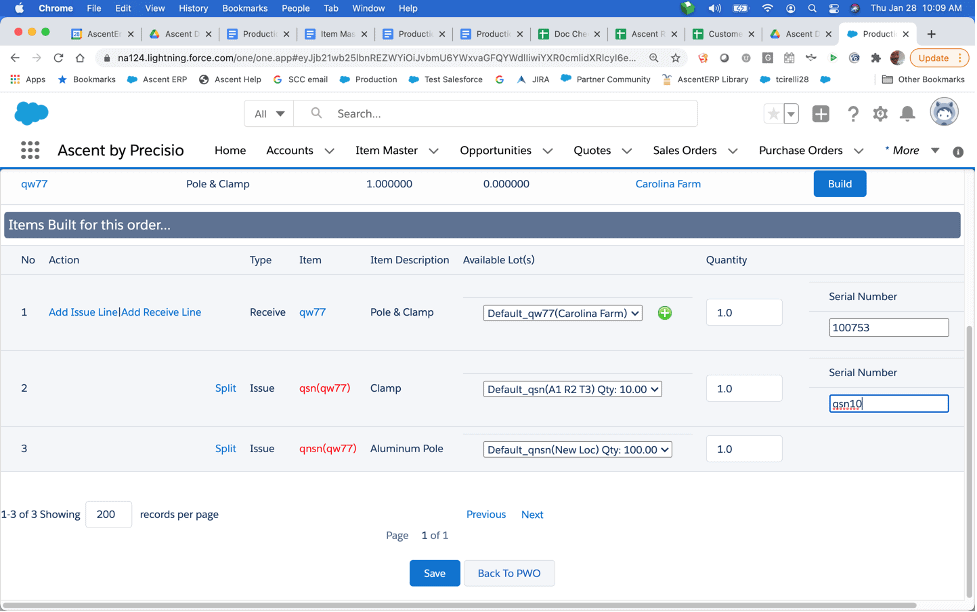
BOM Depletion Lines are associated with the PWO that come from the BOM associated with the item. It lists the Quantity Needed, based on the quantity per on the BOM times the Quantity on the PWO, the Quantity Used, Quantity Left (what is remaining to be consumed) and Qty on Hand (in item master).