Work Order – Creation
Overview
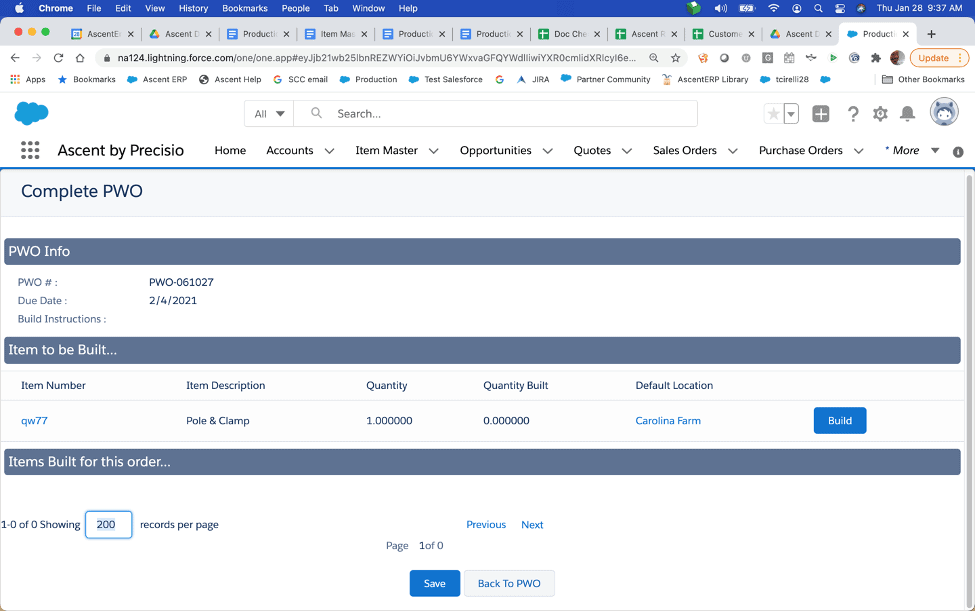
This document will serve as an overview of the functionality available via Work Orders (WO) to create a work order.
Definition: Work Orders are objects in Ascent that serve as a canvas for many areas of material movement, such as picking work orders, repair orders, refurbishment orders, testing orders, and the like. You can also generate customer invoices from completed work orders.
Work Orders consist of:
– Work Order header
– Work Order Lines
– Sales Allocation Lines
– Work Order Completion Lines
There are various types of work orders – picking work orders, which are generated from sales orders, and general work orders, which are manually created in the Work Order tab, but can have many different purposes, based on how the work order lines are set up. An explanation of work order line type and subtype fields comes later in this document.
Custom Settings of Importance: There is one custom setting of importance:
- Picking Work Order Lines Use Lot Rules

If this is enabled, Ascent will use the lot settings from the Admin page for inventory deduction:
Process
One way to create a Work Order is to go to the tab labeled “Work Orders” and click “New”. The following fields are available for entry, based on what your company has chosen to expose for use:
Work Order Details
- Work Order Name -This is assigned by Ascent. It has a prefix, WO-, followed by an 8 digit number. The number is an odometer, meaning that it has 1 added to it for each new WO created. This field is an autonumber field, managed by Salesforce.
- Status – this field has many possible values:
- Open – when a work order is created, this is the value the status field receives
- In Progress – if any activity has occurred with this WO, the status changes to this
- Complete – once all work is done, the status is changed to Complete
- Closed – prior to completion, a user may decide to terminate any additional activity
- Cancelled – no more activity can be completed
- Account – the customer for this work order
- Description – manually entered, this can describe the work to be done on this WO, what is to be repaired, where the pickers need to look if a picking work order, etc.
- Due Date – when the work for this WO needs to be completed
- Total No of Lines – this is the total number of work order lines on this WO
- Total No of Completed Lines – this is the total number of lines on this WO that have been marked as completed
- Currency – the currency of the WO
- Tax Code – this is the tax code for this WO. It can be manually entered.
- Tax Value – the value associated with the tax on this work order
- Owner – the person who currently owns this WO
- Work Order – this work order can be referenced. Optionally, it could be used such that when another WO is completed, this one will be next in the sequence of events.
- User – the user assigned to this WO; optional
- Opportunity – the opportunity associated with this WO, if needed
- Sales Order – the sales order that generated this WO
- RMA – the RMA/CASE that generated this WO, or it can be manually entered
- Entity – the entity of this WO
- Department – can be selected from the department table
- Source Location – this is where the material should be sourced
- Issue Movement Journal – when material is consumed on this WO, this is the movement journal that reflects that
- Issue Reversal Movement Journal – when a completed line which consumed inventory is reversed, this is the movement journal that reflects that
- Receive Movement Journal – when inventory is created on this WO, this is the movement journals that reflects that
- Receive Reversal Movement Journal – when a completed line which added inventory is reversed, this is the movement journal that reflects that
Work Order Lines
- Item Number – this is the item number associated with this WO Line. It can be manually selected by clicking the lookup icon.
- Item Description – this comes from the item master, based on the Item Number.
- Quantity – the quantity pertaining to this WO Line.
- Rate/Price – if the line type is “Labor”, then the value entered in this field can be considered as the labor rate for the service performed. If the line item is “Parts”, then this is the price for this line item for repair, refurb, or whatever.
- Lot – this is the default lot/location from which the material can be consumed, if Consume Inventory? Is selected or added to, if Create Inventory? Is selected.
- Type –
- Labor – this would be used if you are charging for labor for a repair; or, just to reference the type of service being performed on this WO Line.
- Parts – if inventory is to be added/consumed/moved/referenced, you would select this type for the WO Line.
- Subtype –
- Service – this could be use to record labor against a work order.
- Part – another designation that’s available.
- Repair – a repair work order line can be created from a CASE by selecting the Generate Repair Order button, or it can be added manually here.
- Picking – if this is a picking WO, then the value in this field will be Picking.
- Testing – another designation that’s available.
- Inspection – an inspection work order line can be created from a PO or PWO by selecting the Generate Inspection Order button or it can be created manually here.
- Install – another designation that’s available.
- Parts Usage – another designation that’s available.
- Modify – another designation that’s available.
- Delivery – a delivery work order line can be created from a SO by selecting the Generate Delivery Order button or it can be created manually here.
- Move Inventory? If this is enabled, then you will be able to use the WO as a way to move material from one location to another upon completion of the WO Line.
- Consume Inventory? If this is enabled, then inventory will be deducted when completed.
- Create Inventory? If this is enabled, then inventory will be added when completed.
- Billable? If this is selected, then you can use the button “Invoice” which can be displayed after clicking the down arrow next to the Delete button on the upper right hand portion of the screen.
- Status –
- Open – when a WO is initially created, this is the status.
- In Progress – this is the status the WO gets when some work is applied to it.
- Complete – when all lines are completed, this becomes the status.
- Cancelled – if a user determines that no more work is to be done against this work order line, it can be changed to Cancelled to indicate finality.
- Sales Order Line – if this is a Picking Work Order, then this is the sales order line associated with the originating sales order.

There are other pieces of documentation that will describe Picking, Delivery, Inspection, and Repair Work Orders in more detail.